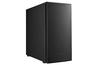
Lian Li PC-68
Recently there has been a lot of development in PC cases: we have been lucky enough to work with Coolermaster and test their 200, 201, and 310 Cases. These were nice works of art: when I first got my 200 I was amazed and I still use it now.There is a new name on the street under the name Lian Li. These guys make the same sort of cases as Coolermaster but with other little features rolled in. People now seem more forced on the style of the cases as it matters what they look like. For example, the Mac's main reason for the increase in sales is that people like the design. They are also popular on TV programs due to this (BBCs Watchdog for example uses IMacs as they fit in with the design).
But you can’t get those cases on their own, once you remove them you have 2 main
people left, Coolermaster and Lian Li. All of the geeks and some offices out
there will be dead fallers for these cases, which are in ATX format. You can get
one of these and put anything in them, and they look nice. Also they will
impress people at LAN parties. A lot of people are heading for modded cases,
with these 2 sets of cases they already have fans built in so they look more
unique than anything else.
As standard these cases are shipped without PSU, as it is clear that anyone who
is buying one will want to build up a nice little custom rig with a high rated
PSU, or even a specialist silent one (maybe if they want it for a box next to
the TV).
So on to the Lian Li, this is the high end range of the Lian Li cases, it is
brushed aluminum with a clip on front (painted parts of the bezel.)
Specs.
Model: PC-68
Type: PC Case
Dimensions: 492x210x450mm
Form factor: ATX
Drive bays: 4x5.25" 3x3.5" 3x3.5"(hidden)
Panel feature: Power, Reset, Leads, filter Leds, USB port
Slots: 10
Power supply(Y/N): NO
Material: Aluminum
Thickness: 1.5mm
Additional features: Two fan in the front one fan in the rear slideable
Mainboard house 5-in-1 LED Connector wire
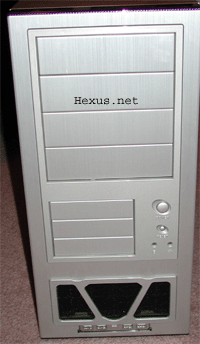
The first thing that you notice about the case is the attractive front with USB
ports located at the bottom. When you turn around the case it has the area for
the PSU, this is a bracket which you simply unscrew, attach the PSU, then put
back in. This design is slightly better in a way than on the Coolermasters where
you have to slide the actual unit in, but at the end of the day the Coolermaster
is a little more secure. The advantage of shipping it without the PSU is that
the case is far more customizable and also lighter for shipping.
The case is a midi tower case, it has 4 X 5.25 inch bays, and 3 X 3.5, and 3
internal hard drive bays.
This is compared to the 4 X 5.25s on the Coolermaster 201, and 2 X 3.5 floppy
drive bays (4 hard drive bays.)
All of these cases are made in the same part of the world, and in my time I have
seen some seriously crap designed ugly cases. I have to say Lian Li is a lot
smarter than this ;) They have developed a case which is both smart and
practical. They have a created a "nice" on/off switch unit - it doesn’t look
tacky or out of place. I would be tempted to replace the LEDS with blue ones
though ;)
Like on the Coolermaster and on some Yong Yang’s, the Lian Li uses Thumb lock
screws that are also removable with a screwdriver. To build the system you will
still need one for mounting hard drives, but to whip the side of the case off
there is no need ;)
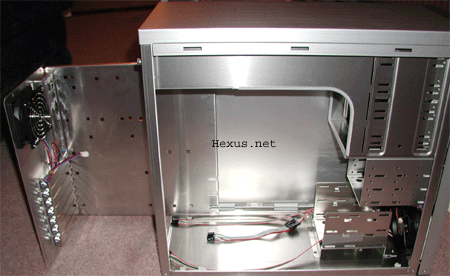
As we see with most cases now the side panels just slide off, to give you easy
access to the case. This is a feature which I like on the case, and it makes my
life a lot easier ;) When you remove the side you notice one thing which I have
to say YAY! at. This is the plastic trim which is near the CD Rom drive bays: a
lot of cheap cases out there are sharp and you can bet your leg that you will
cut yourself. The inside of the Lian Li isn't as smooth as it could be, but
where they think it might cut you they have put a plastic shroud. Why don’t all
companies do this? It is so simple but effective.
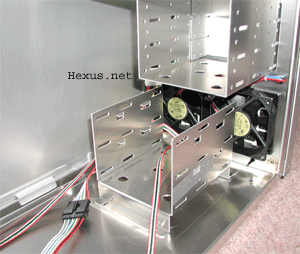
When you have your 1.333 GHz TBird sitting inside the case you don’t care what
it looks like - it needs to remain cool, so what do Lian Li do? Well they stick
some fans in it; they have 2 80mms at the front pre-mounted, and one at the back
as an exhaust fan. This is a common location for fans and has been tried and
tested, and is a respected way of mounting them. They have also located a filter
inside here to make sure you're blowing "clean air" all over your pc stuff ;)
They have also put a grill over the rear mount fan this is a nice feature, this
fan can be plugged in to your motherboard to allow you to monitor the fan (if
you so-wish). These 2 front fans will be talked about more lately ;)
Right, well it is time to install your system, you need to pull the sides off,
and get access to the main unit. Once you have mounted your motherboard you can
put the sides back on, 'but' I hear you say, how can you remove the front? Well
all you do is pull it from the bottom and it unclips, very easy to do. This is a
good feature in a way but in another way a very bad one, it could mean the front
of your case coming off, but even so I like the feature. I would prefer it to
have a single thumb lock on the back or something to make it a little more
secure.

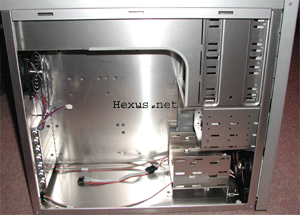
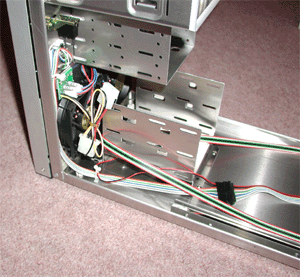
Behind the front bezel you will see a range of features: it gives you access to
the 3.5 sector of the cage, and also to the control unit. The blanketing plates
are simply bent units like on any other case ;)
The control unit, this is a little switch which lets you control the 2 front
fans, so that you don’t need them on all of them time, this little unit has 3
positions 1, 2, and 3 ;) This simply connects to a simple PCB which controls the
fans it is basically regulating the main system voltage (7.5, 9.8, and 12v)
The fans which they have put in the case aren’t expensive Ball bearing fans but
they are still ok for the job. You might want to replace them with something
like a YSTech, or if your nuts in the head some 80mm Deltas ;) By switching the
unit it doesn’t make a massive difference to the overall noise.
Most people sit there systems on the floor, therefore the front filter makes a
big difference and it is very helpful to have the filter there. It means you're
not blowing cr*p all over your system. Just make sure you clean it out
regularly.
The overall looks of the case are nice, but I would have to say that a
Coolermaster has that edge on it; they look more "classy" as the finish on the
panels isn’t up to what I was expecting. Also at the top they have attempted to
do a Carbon Fibre look which I have been told it isn’t ;) Hey would be cool if
it was!
USB, they have located some USB ports on the front of the case with a small
plastic cover over them, this is a good feature, but yet again like the
Coolermaster they just haven't made it look as good as they could have ;) Come
on guys!
Testing.
Well how else can we try it unless we strap some goodies inside it? This case is
a performance one and it is designed for style and looking good ;)
Well first things first to install the PSU, as I said before there is the
mounting plate which helps you to install the PSU very quickly and you don’t
need to be a god to work out how to do it. I decided to slap a normal 300W PSU
in to the case, and build a TBird system into it ;)
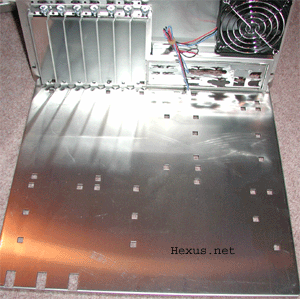
Next is to slide out the motherboard tray and mount it, They have one awesome
feature which is the "split" Connector rig, where you don’t have to pull all of
your hard drive, power, led connectors off to pull out the motherboard. It goes
to a central pad which you can unplug - very easy and quick.
As usual on cases these use small little "gun towers" to mount the motherboard
this is the same as on most other cases on the market, they are quick and easy
to fit, but hurt unless you're used to fitting them.
At the back of the case there are the mounting sectors for the graphics card
which is thumb lock screw-sized.... Simple enough ;)
To mount hard drives you just need to remove the cage and fit them, and then
remount, it is useful having this sitting next to the fans especially if you’re
running a SCSI rig ;) then the fans act as cooling for the system.
Conclusion.
Well it is a case; and it is a good one. It is a lot cheaper than the
Coolermaster but it still has style. I like it overall and find it a good system
to work with, I wouldn’t hesitate in recommending it to anyone...
You would have a problem filling this case to the max, it looks good with Beige
drives in it, and it is a nice bit of kit, but I would ask people to think if
they can afford the extra for the Coolermaster range, which have a better
overall finish to them.
These cases are expensive but they have some very cool features such as the USB
ports, and also the Central pad connector (which I wouldn’t mind seeing on EVERY
case on the market it is cheap and very effective.) They have also thought about
the ease of use, the case had the plastic edges on the inside to stop you from
cutting yourself. The case is light and has a consistent finish all over the
unit. I like this case, and I think it makes a nice finish to a system.
The main feature which I like is the fan bus which is built in, so for a case
packed with features and looks this is a bargain, I like a lot of the extras in
this case and I would probably nick some of them if I were to develop my own
case. Well done Lian Li - this case is a good bit of kit.