You will sit down and pay attention dammit!
Important terminology
Let's have a quick look at some of the terms that will be used a lot in this guide:
Front side bus (FSB) - a technical explanation here
Northbridge - a technical explanation here
Southbridge - a technical explanation here
BIOS - a technical explanation here
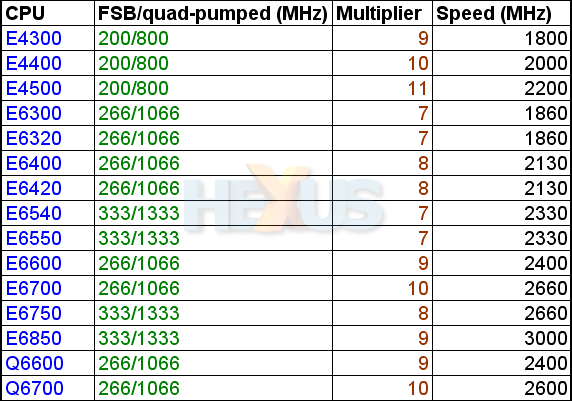
And now the stock values of the most popular Core 2 Duo CPUs:

In the above table, we've left out the Xtreme models since, as we've said, this guide is aimed at ordinary folk not hard-core enthusiasts.
As you can see, the FSB x the multiplier gives you the CPU speed in MHz. So, for instance, the E4300's FSB of 200MHz x its multiplier of 9 produces the CPU's speed of 1800MHz.
When you see C2D CPUs advertised, most are shown as having FSB speeds
of 1066MHz or 1333MHz. Those are the quad-pumped (and more
eye-catching) speeds of CPUs with clock frequencies of 266MHz or
333MHz. Check out this technical explanation but know that we'll be using the real clock frequencies - the lower figures - in this guide.
The
CPUs in the table above have multipliers that are upward locked. This
means that you can't increase the multiplier in the BIOS, even though
you may be able to change it downwards - decreasing it - something
we don’t need to bother with right now.
Since the multiplier
is locked, we need to find another way of increasing speed and we do
that by increasing the frequency at which the FSB runs.

As you can see, when you raise the FSB frequency, the CPU runs
at higher speed. In theory, this means that it performs much faster.
The
above examples can be applied to any C2D CPU but CPUs that have a lower
multiplier need to run with a higher-frequency FSB to reach the same
MHz - compare the table below and above.

** Looking at the two tables above, you can see that the FSB of the E6300's motherboard
has to be run at 515MHz for the CPU (with its 7x multiplier) to reach
around the same speed (in MHz) as the E6600 achieves with its FSB set
at 400MHz and having a multiplier of 9x.
But running the FSB at
515MHz puts a real strain on the motherboard and often requires a lot
of extra voltage to be provided to the northbridge and CPU.
For
now, we won't be worrying about really high FSB speeds - well, not any that are over 400MHz.
That's because when the FSB speed becomes very high, there are other variables that come into play and those really aren't suitable for
discussion in a guide aimed at beginners.
Hopefully, you should now have an idea of what we are trying to achieve, so let's get down to business.
We
are going to be using an E6600 CPU and an Asus motherboard, the P5B
Deluxe WiFi AP. We've also got BIOS pics of an Abit Quad GT
motherboard, thanks to Daza. Confusing matters just a little, some of the screen grabs were taken on a system with an E4300 CPU.
We'll be providing plenty
of BIOS screen shots, so you can see what changes we've made.
These BIOSes may look somewhat different to the one on your motherboard but,
hopefully, the wording will be similar(ish).
The
motherboard's BIOS can be updated and we'd recommended that you do
that. However, you should follow to the letter the advice given on the web site of your
motherboard maker - get things wrong and you can end up with a dead
motherboard!
Also, before you start overclocking, try and
familiarise yourself with the BIOS and some of its basic functions. If
you built the PC yourself, you will have been into the BIOS at least once before to adjust
the time and date and maybe some other settings.
However,
it's necessary for us to assume that you know how to access the BIOS, make changes to
it, save them and exit. You really should also know how to
clear the CMOS to zero the BIOS settings back to their defaults. So, if you don't know how to do these things, find out
before moving on - your motherboard manual is the place to start!


