


Editing basics
Edition's cutting interface uses a traditional source/edit layout. The source monitor is for viewing and trimming media before it’s added to a movie, and the edit monitor shows the work that’s taken place on the timeline. Captured video can be viewed in the source monitor, or from a stand-alone viewer. The stand-alone viewer
The stand-alone viewer has many of the same controls as the source monitor for playback, trimming and applying clip markers for reference, but adds colour-correction controls, audio-level adjustment and scene-detection tools.
In addition, clips in the rack can be played back as thumbnail icons by Alt+double-clicking them. Each type of playback viewer has a time-marked scrubbing bar, but it’s also possible to scrub by clicking on the displayed image and dragging the mouse left or right.
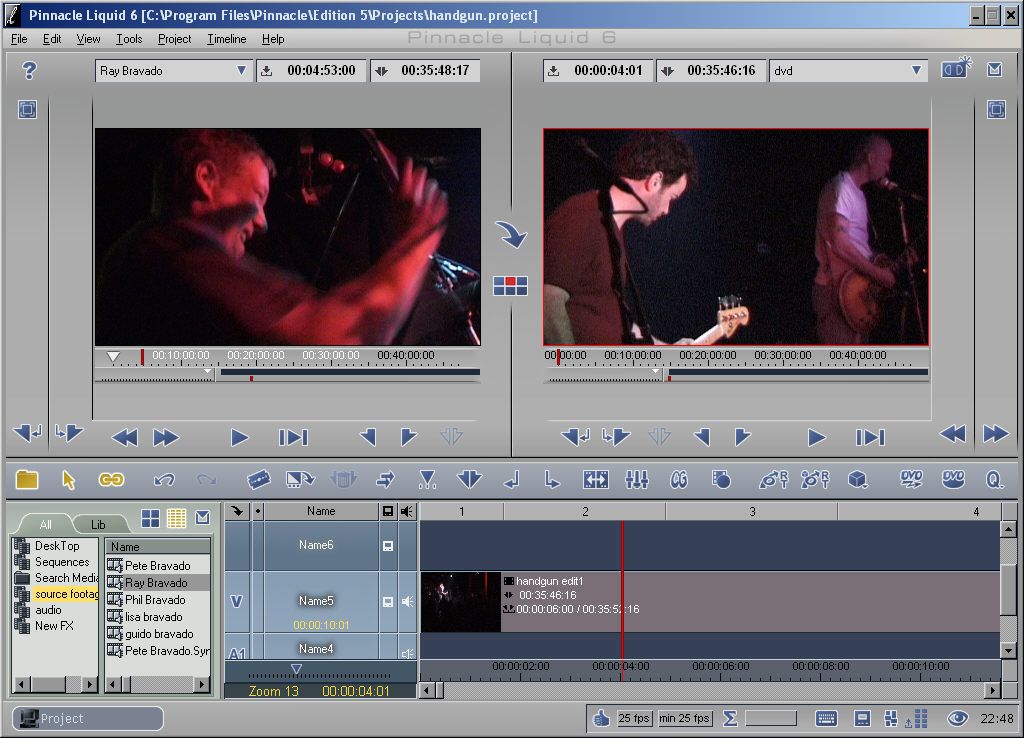 Liquid Edition 6’s main interface with source/edit monitors, project window and timeline
 Clips that are trimmed in the source viewer can be added to the timeline in one of two mode - Overwrite (footage to the right of the scrubbing bar on the timeline is replaced) or Film Style (footage is moved further down the timeline). Clips can, of course, be added to the timeline simply by dragging and dropping.
Edition automatically places the timeline's scrubbing bar at the end of the newly-added clip when we’d prefer to have the bar left where it originally was, for fine adjusting the join between the last clip and the one before, and we think there should be an option to choose that way of working even though it’s not provided in most prosumer and professional editors.
Storyboarding is also possible by dragging clips in an overlapping sequence onto a blank area of the program's interface called the desktop. A right-click on the overlapping clips allows them to sent to the timeline in one go.
The timeline supports an unlimited number of tracks, each able to hold video or audio or both. When a DV clip is first added, it's shown on a single track but can be separated into video and one or more audio tracks using the Disband-clip command.
Waveforms and audio levels can be made visible on the timeline, and the tracks themselves can be renamed and scaled to any height. There's a slider at the bottom to zoom in and out of the time scale for editing frame by frame or getting different overviews of the edit.
Clips on the timeline can be trimmed by clicking and dragging their edges, and there are options for slip and slide editing, where clips are repositioned without disturbing material to the left and right. As with earlier versions there is a big, friendly trimming window, offering first-class control over the placing of edits.
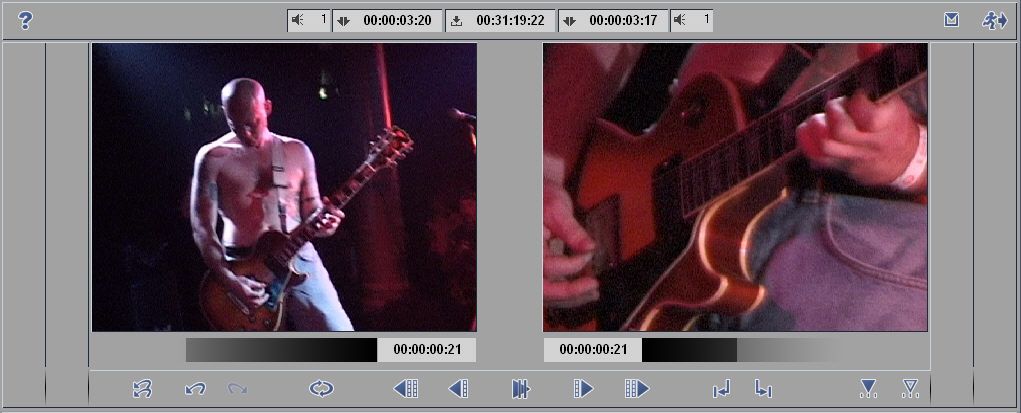 The big, friendly trimming window makes it easy to cut accurately
 Before any cutting decisions can be applied, the relevant timeline tracks need to be activated. This enables effects to be applied to several tracks at once, and also allows transitions to be placed between clips on different tracks. The program supports multiple sequences, each with its own timeline, and these can be treated as self-contained clips and nested together. One potential use is for different editors to work on different scenes that are only later brought together in a final production.


