


Initial Preperation
Initial preparation
I covered VapoChill installation in the original XE articles, but I'll do so again here since the evaporator mounting is so different to the other VapoChill models. The basic theory behind the mounting is still the same; enclose the CPU area with closed cell foam, heat the socket area with the heaters, clamp the insulated evaporator head to the processor as tight as possible. The application is a little different though.Preparing your motherboard is still the first step. In terms of the ASUS SK8V Athlon FX/Opteron motherboard I've used in the review, that means unscrewing the existing heatsink retention mechanism so that you can attach a backplate.
You cover the backplate with some closed cell foam, adhesive on one side, followed by a heater element to warm the back side of the board. Place a couple of washers over the correct holes for your motherboard, on the backplate, and then hold it against the motherboard itself. Then from the front, screw the mounting rods through the motherboard holes, again with washers (this time thin ones). It's handy to have a friend around to help, since the washers on the backplate side will move around if you're doing it solo and it's easier with two pairs of hands.
With the backplate and mounting rods attached, preparing the evaporator is next.
Preparing the evaporator head
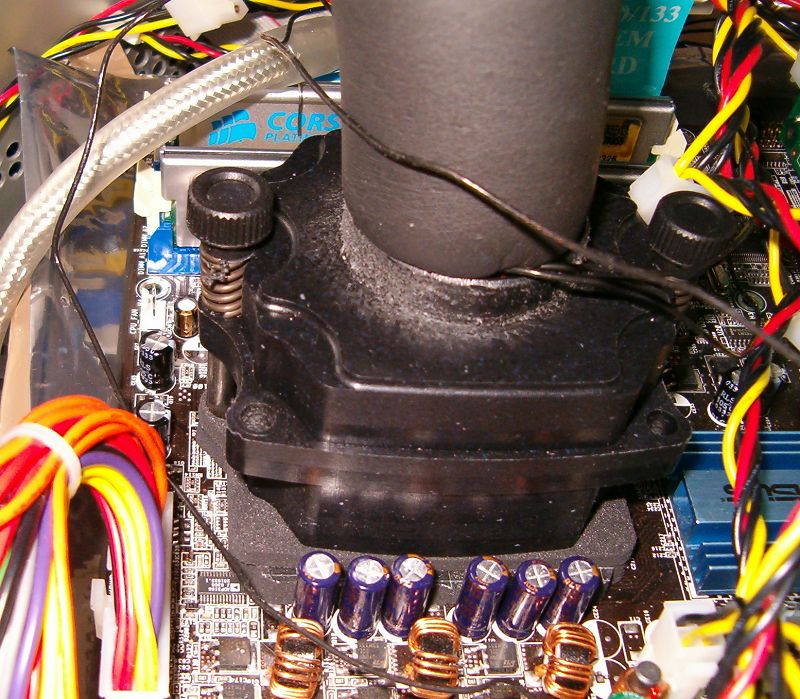
Preparing the evaporator head is something Asetek could do for you. It's not too time consuming or particularly hard, but it would save you the potential for doing something wrong. A sturdy plastic shell is lined with a heater element and the evaporator head is pulled through the top. A couple of pieces of packed foam go behind the head, into the shell, before a final piece of packed foam goes over the top, the copper evaporator head poking through only a couple of millimetres, to contact with the CPU.Preparing the topside of the motherboard
Preparing the top of the motherboard is much the same as with a VapoChill XE. The socket needs preparing with the supplied heatsink compound. With your CPU removed, 'draw' compound into all the holes in the socket, using the syringe. The manual recommends you use the supplied pipe cleaner to assist, but I've never needed it.Two pieces of closed cell foam slide over the mounting rods, around the prepared socket. The first one might have to be trimmed with a good pair of kitchen scissors to help it fit your motherboard. Once in place, you peel back the label to reveal the adhesive side. Then slide the second piece of foam over the mounting rods and down onto the adhesive, creating a two layer cell.
Attaching the evaporator to the CPU
The design of the evaporator mounting makes this trivial. The evaporator mount can rotate 360° around the evaporator head, albeit slowly due to the pressure applied by the packed foam, but if you do your homework and pack the evap shell after figuring out how the head will contact the CPU, you can get the mounting direction spot on. It's a brilliant piece of design. Dropping the fixed angle of attack used in previous VapoChills is a welcome step in the right direction. Here's hoping the mounting design makes it to all new models.To mount the evaporator on the CPU, it's a simple matter of sliding the shell over the rods, pushing it down firmly but without any undue movement, then screwing it down using Asetek's excellent hand screws. A spring and washer per screw provide the stable tension. Screw them down all the way, et voila.
Setting up the ChillControl 3 USB
The ChillControl is a piece of cake to setup. Mount the controller somewhere in your case using the sticky pads, then hook up the LCD data bus connector from the LightSpeed, a 4-pin Molex for power, the USB cable from CC3 to motherboard, the power switch passthrough, your heater elements and the LightSpeed controller cable. Done.Connecting it to the mains
The LightSpeed runs off your AC mains supply. The unit comes tethered to a hermaphrodite power connector. One end into your PSU, your mains cable in the other side. Complicated stuff.Time to fire it up after that.


