You've heard all the hype and for once it holds true: Windows 10 is really rather good, and that means millions of users will be eager to take advantage of Microsoft's free upgrade. So how do you do it?
For most, it'll be a case of following the little 'Get Windows 10' tray icon and completing the steps for an in-place upgrade from Windows 7 or Windows 8. That's probably the preferred and most convenient option for most, but for the old-school among us there's nothing better than carrying out a completely clean transition to a new version of Windows. In this brief tutorial we'll outline the what, the why and the how.
What is a clean install?
In a nutshell, a clean install is when you wipe your computer's hard disk and then install the operating system (in this case Windows 10) from scratch. It's a fresh start. A new beginning. A clean slate.
That all sounds good, but be careful: a clean install means everything is wiped from your PC. So before you start, be certain to make a backup of all your important data. Don't forget the little items like passwords, browser favourites and the Notepad-based to-do list sat on your desktop. Granted, a good amount of these items are now probably synchronised with the cloud, but to be on the safe side double-check you have everything you need before you proceed.
Sounds a little risqué, why should I do it?
We're staunch advocates of clean-installing Windows, though we'll also admit that Microsoft's in-place upgrades work better than ever. We've upgraded a few machines to Windows 10 and have experienced no problems, and we suspect the majority of users will be perfectly satisfied with the normal procedure. Think of it as going from iOS 7 to iOS 8 on your iPhone - the in-place upgrade process usually works, it retains your data and apps, and it's as easy as pressing a few buttons and then twiddling your thumbs while the OS does all the work.
However, PC's are wonderfully unique in that they can be cluttered with lots of terrible software (dubbed bloatware) that bogs down the hardware and offers very little in return. And the bloatware isn't necessarily your fault - it's usually snuck on by the manufacturer of your machine in an attempt to generate a little extra income on the side. It's kind of like buying a new car only to find that multiple doughnut-eating passengers are coming along for the ride. You could get rid of them with a little effort, but crumbs and gooey jam would be everywhere so wouldn't it just be nicer to start over?
Our recommendation would be to try the in-place upgrade to begin with. If you're happy with it, great. If your PC still feels bogged down with unnecessary software and other erroneous clutter, spend a little time getting to grips with Windows 10 and then clean install at a time that suits you.
I want in, how do I do it?
First, the bad news: clean installing Windows 10 isn't entirely straightforward, but we've done it ourselves on more than one occasion and we've jotted down the potential pitfalls to help you avoid them.
Here's what you'll need:
- A PC, laptop or tablet running a genuine version of Windows 7 or Windows 8.1
- A USB pen drive (3GB or greater in size)
Step 1 - prepare your USB drive
Head over to the official Download Windows 10 website to obtain the tool required to create your installation media. There are 32-bit and 64-bit utilities available, and unless your PC is particularly old, it's the 64-bit version you'll be wanting. Download and then run the tool - named 'MediaCreationToolx64.exe' and weighing in at around 19MB - and you'll be presented with a Windows 10 Setup wizard.
 |
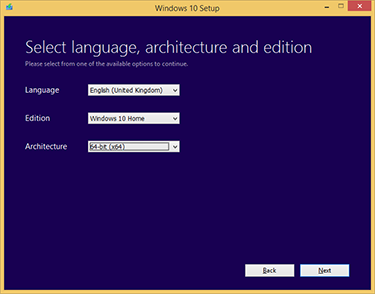 |
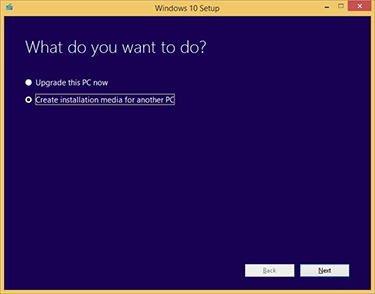
As pictured above, start by choosing 'Create installation media for another PC.' On the next screen, choose your preferred language, product edition and whether or not you want to install a 32-bit or 64-bit version of Windows 10. It'll be the latter for most, and be aware that the free upgrade mandates a like-for-like transition.
If you're a licensed user of Windows 7 Starter, Windows 7 Home Basic, Windows 7 Premium or Windows 8.1, you'll be eligible for a free upgrade to Windows 10 Home. Likewise, those using Windows 7 Professional, Windows 7 Ultimate or Windows 8.1 Pro will be eligible for the free upgrade to Windows 10 Pro. As for the 'N' product editions you'll see in the drop-down menus, feel free to ignore them completely - they simply exclude Windows Media Player in order to adhere to EU rulings and frankly make no sense to anyone.
 |
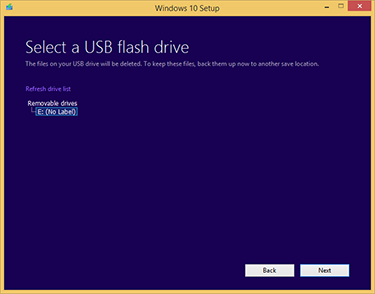 |
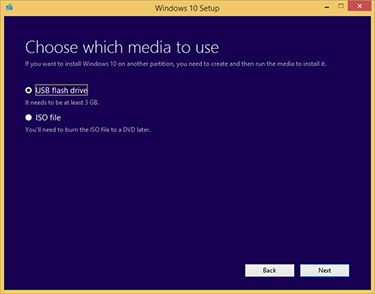
Choose 'USB flash drive' as your media device of choice, then select it from the list on the next page. It needs to be 3GB or larger in size, and note that everything on the USB drive will be deleted - if it contains any data you need, copy it off before you begin.
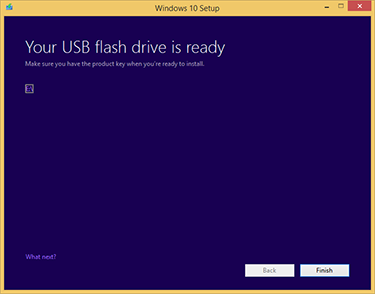
With the drive selected, hit next and the software will start to download the Windows 10 installation files and copy them across to your USB drive. The process can take a while, so now would be a good time to put the kettle on.
 |
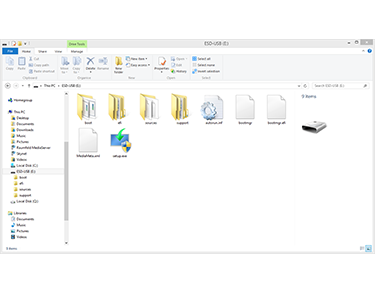 |
Once the process is complete simply hit finish and your USB drive is good to go - it can be used on any PC to install Windows 10, so keep it handy for any future installations. If you want to double-check, the files on your drive should tally-up to what's pictured above, right.
Step 2 - upgrade to Windows 10
Things are about to get counter-intuitive, but bear with us. In order to take advantage of the free upgrade offer and clean install Windows 10, you first need to carry out an in-place upgrade to Windows 10 from a genuine copy of Windows 7 or Windows 8.1.
For better or for worse, this is how Microsoft has chosen to verify the free upgrade - you will only be able to activate the new OS if you perform an in-place upgrade to Windows 10 from Windows 7 or Windows 8.1. You can not clean install Windows 10 using a Windows 7 or Windows 8.1 product key.
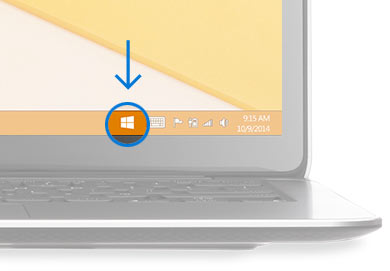
In order to begin the upgrade, click the 'Get Windows 10' icon in your system tray and follow the on-screen instructions.
Don't see the icon? You might be able to manually trigger the update. First, make sure you have automatic Windows Updates enabled in control panel, then launch an elevated Command Prompt (Win+X, then choose 'Command Prompt Admin') and enter the following command: wuauclt.exe/updatenow
Windows 10 should then begin to download and, provided you had a genuine copy of Windows 7 or Windows 8 to begin with, Windows 10 will install and activate automatically. The activation should be instant, but there have been teething problems presumably due to the strain being placed on Microsoft's servers - wait a while and Windows 10 will activate itself.
Step 3 - the clean install
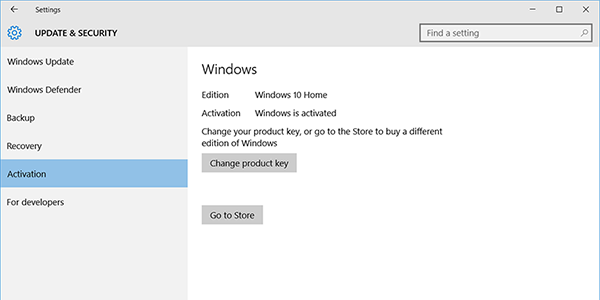
Once you've completed the in-place upgrade to Windows 10, verify that your installation is activated by heading to Settings and then Update & Security. You should see something like this:
Your free upgrade has worked and the device you are using is now authorised to use the stated edition of Windows 10. This eligibility is recorded on Microsoft's servers, though we're uncertain at this stage whether the authorisation is tied to hardware IDs or your Microsoft account - we suspect it's a bit of both.
Either way, the device is now Windows 10 activated, and that means the new OS can be re-installed on the same hardware at your heart's content. You don't need a key, you simply install the OS and it'll activate whenever you're online. You just need an Internet connection.
That means we're finally ready to clean install. Here's what you do:
- Boot from the USB drive you created in Step 1. This may require re-ordering the boot sequence in your BIOS, though some systems allow you to choose a boot device by pressing F12 at startup.
- You'll then be greeted by the Windows 10 installation wizard. The first screen will ask you for a product key, but seeing as you've followed all the steps thus far, your device is already activated so you can happily skip this step.
- Once you've accepted Microsoft's software license terms, you'll be asked to choose which type of installation you want - upgrade, or custom. Choose 'Custom: Install Windows Only (Advanced)'.
- You'll now see a list of available hard drives and partitions. If you have just the one drive, and you've backed up all the data you want to keep, you can delete all the existing partitions and then select the one remaining unpartitioned volume (Drive 0). The install wizard will then automatically configure the drive and continue.
- The installation should then begin and after a restart or two, you'll eventually arrive at a screen stating "It's time to enter the product key." Fear not, click the 'Do this later' option hiding near the bottom of the screen.
- Choose your account preferences and you'll arrive in a clean Windows 10 desktop. Go online (if you aren't already) and Windows 10 will automatically activate by recognising the device.
It's a bit of a long-winded process, and we do wish Microsoft had allowed Windows 10 installations using Windows 7 or Windows 8 keys, but then it is a free upgrade so we're willing to jump through a few hoops.
Now that it's done, enjoy your fresh install and take solace in the fact that your next clean install of Windows 10 on the same device will be much easier - you'll only need to repeat Step 3.
What else do you need to know?
You might be wondering what happens if you upgrade your current PC to Windows 10 and then decide to build a new machine? Given that Windows 10 will be tied to your current machine, we don't imagine you'll be able to transfer the activation to another system.
How does that translate to smaller hardware changes? That remains a bit of a grey area, but we've changed the hard disk in one of our Windows 10 PCs and we've been able to carry out another clean install and activate without a problem. We suspect that bigger changes - a new motherboard, for example - may scupper the activation but we've yet to confirm that this is the case.
What if you're running Windows XP or Windows Vista? Sadly, you're out of luck - the free upgrade offer is only applicable to users of Windows of Windows 7 and Windows 8.
What if you've bought a retail copy of Windows 10? You can go straight to Step 3 and clean install using the product key that came with your software.
And then there's the big question: should you even bother upgrading to Windows 10? It is, in our estimation, shaping up to be the best Windows to date, however it's also unique in that this is the first Windows to be delivered as a service. What this means is that Windows is changing from a product that sees periodic major releases to one that's frequently being updated. As such, Windows 10 is never entirely finished, and at launch there are still bugs being squashed - there's already been a day-one patch weighing in at over 1GB.
Waiting for the quirks to be ironed out isn't the worst idea, and the free upgrade offer is currently scheduled to run until July 29, 2016, so there's really no hurry. And who knows, other, less-convoluted methods of clean installing may become available in that time.


